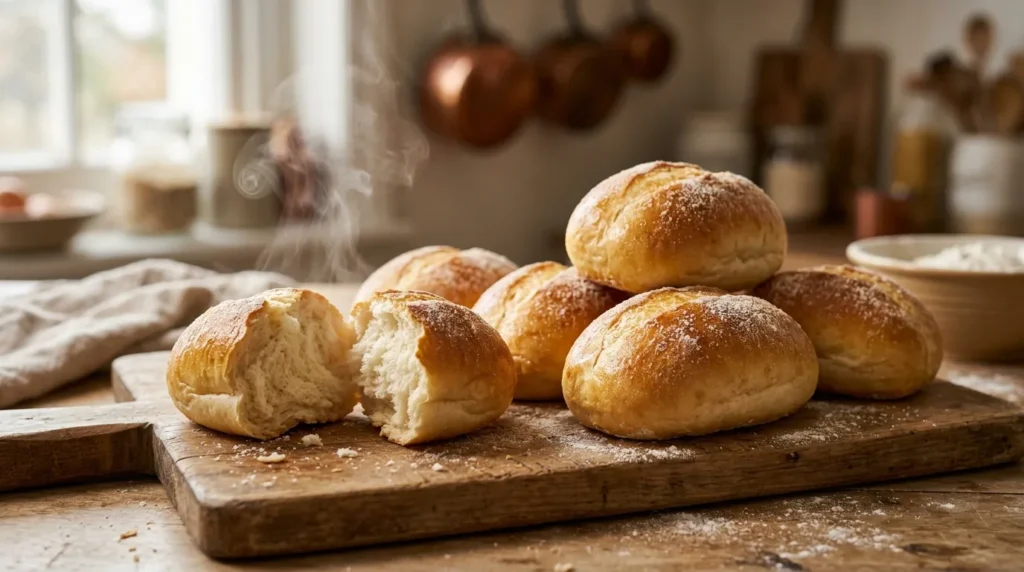
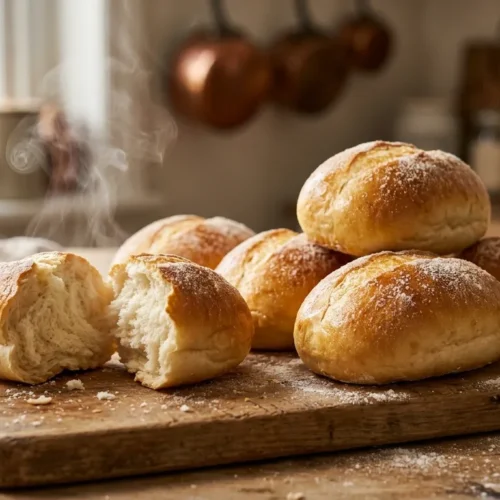
Soft & Chewy Sub Roll Recipe
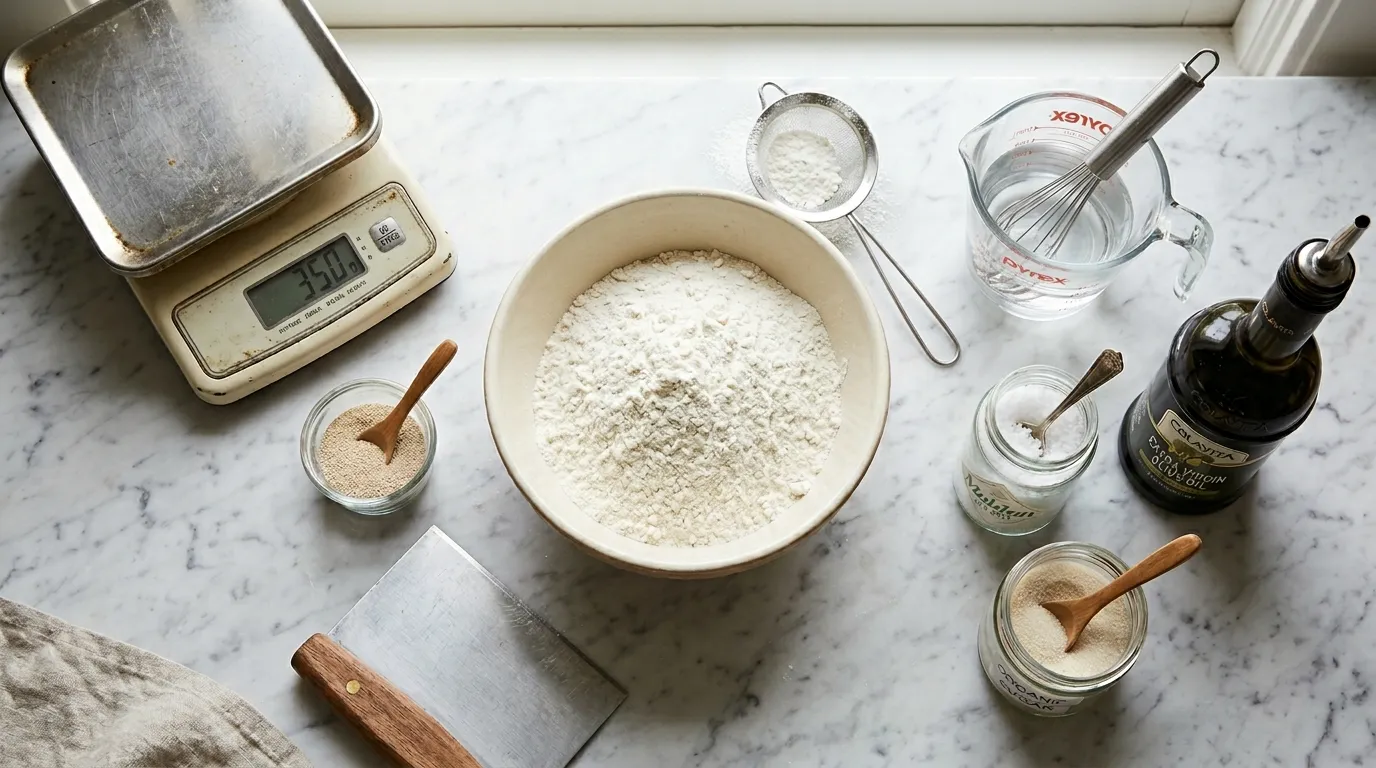
Equipment
- Stand Mixer (Optional)
- Baking Sheet
- Digital Scale
- Parchment Paper
Ingredients
Dough
- 450 g Bread Flour (approx. 3.5 – 4 cups) – High protein is key
- 1.5 tsp Instant Yeast
- 1 tbsp Sugar
- 1.5 tsp Fine Sea Salt
- 2 tbsp Olive Oil
- 300 ml Warm Water 110°F (43°C)
Finishing
- Cornmeal for dusting
- 1 Egg beaten with 1 tbsp water for egg wash
Instructions
- Mix and Knead: In a stand mixer bowl, whisk together bread flour, sugar, instant yeast, and salt. Add warm water and olive oil. Mix on low until combined, then increase to medium-low and knead for 8-10 minutes until the dough passes the ‘windowpane test’.
- First Rise: Form dough into a smooth ball and place in a lightly oiled bowl. Cover and let rise in a warm spot for 1 to 1.5 hours, or until doubled in size.
- Shape the Rolls: Punch down dough and divide into 6 equal pieces (approx 120g each). Flatten each piece into a rectangle, roll up tightly like a jelly roll while creating tension, and pinch seams shut tightly. Roll under palms to elongate to 6-8 inches.
- Second Rise: Place rolls seam-side down on a baking sheet lined with parchment and dusted with cornmeal. Cover loosely and let rise for 45-60 minutes until puffy.
- Bake: Preheat oven to 400°F (200°C). Brush rolls with egg wash and score the tops. Place in oven and (optional) toss ice cubes on oven floor for steam. Bake for 18-22 minutes until golden brown and hollow sounding.
- Cool: Let cool completely on a wire rack for at least 30 minutes before slicing.
Notes
There is a very specific moment of disappointment that happens when you make a beautiful sandwich on subpar bread. You take a bite, and the bread either disintegrates in your hands or is so tough that all the filling shoots out the back. I’ve been there, and that is exactly why I spent weeks developing this sub roll recipe.
I wanted a roll that had a “bakery-style” chew—soft and pillowy on the inside, but with a golden, sturdy exterior that can hold up to heavy sauces, meatballs, or a mountain of cold cuts. When you pull these out of the oven, the smell of toasted yeast and warm flour fills the entire house. It’s that nostalgic, comfort-food aroma that instantly makes you hungry.
This isn’t just another bread dough; it’s a dedicated sub roll recipe designed to elevate your sandwich game. Whether you are making a Philly cheesesteak or a classic Italian hoagie, the foundation is the bread. The best part? You don’t need a fancy steam-injected oven to get professional results. I’m going to show you exactly how to achieve that signature texture right in your home kitchen.
Why You’ll Love This Sub Roll Recipe
If you have been intimidated by baking bread in the past, let me put your mind at ease. This is one of the most forgiving doughs I’ve worked with, yet it yields results that look like they came from an artisan bakery.
Here is why this sub roll recipe deserves a permanent spot in your recipe binder:
- Perfect Structure: The hydration level is balanced to ensure the crumb is soft (what we call “tight but fluffy”), so it absorbs sauces without becoming a soggy mess.
- No Fancy Equipment: You can make this with a stand mixer or by hand. I actually prefer kneading by hand sometimes—it’s therapeutic to feel the gluten develop.
- Freezer Friendly: These rolls freeze beautifully. I usually make a double batch so I have sub roll recipes ready to go for busy weeknight dinners.
- Better Than Store-Bought: Most supermarket rolls are full of preservatives and air. These are substantial, flavorful, and cost a fraction of the price.
Ingredients & Substitutions
To get that authentic deli-style texture, the ingredients matter. Here is a breakdown of what you need and, more importantly, why we use them.
- Bread Flour: This is non-negotiable for the best texture. Bread flour has a higher protein content (usually 12-14%) compared to all-purpose flour. This protein creates gluten, which gives the roll its signature “chew” and structural integrity. If you only have all-purpose flour, you can use it, but the rolls will be softer and less chewy—more like a hot dog bun.
- Instant Yeast: I prefer instant yeast because you can mix it directly into the flour without proofing it in water first. It’s faster and more reliable. If you are using Active Dry Yeast, you must activate it in warm water with a pinch of sugar for 5-10 minutes until it foams.
- Sugar: We use a small amount of sugar not to make the bread sweet, but to feed the yeast and help with browning the crust.
- Salt: Never forget the salt! Bread without salt tastes like cardboard. I use fine sea salt or kosher salt.
- Olive Oil: A little fat softens the crumb and keeps the bread fresh longer. You can substitute melted butter if you want a richer flavor, but olive oil gives it that classic Italian bakery vibe.
- Warm Water: Ideally around 110°F (43°C). If it burns your finger, it will kill the yeast. If it’s too cold, the rise will take forever.
- Cornmeal (Optional): Dusting the baking sheet with cornmeal prevents sticking and adds that signature crunch to the bottom of the roll.
How to Make Sub Roll Recipe
Making bread is a process of patience. Don’t rush the rise; let the yeast do the work. Here is my step-by-step guide to nailing this sub roll recipe.
Phase 1: Mixing and Kneading the Dough
Start by combining your flour, sugar, instant yeast, and salt in the bowl of a stand mixer. Give it a quick whisk to distribute the ingredients. Add the warm water and olive oil.
Using the dough hook attachment, mix on low speed until the dough comes together. Once it forms a ball, increase the speed to medium-low and knead for about 8 to 10 minutes.
Chef’s Tip: You are looking for the “windowpane effect.” Tear off a small piece of dough and gently stretch it. If it stretches thin enough to let light through without tearing, the gluten is fully developed. If it rips immediately, knead for another 2 minutes.
Phase 2: The First Rise (Bulk Fermentation)
Lightly grease a large bowl with oil. Form your dough into a smooth ball and place it in the bowl, turning it once to coat the top with oil (this prevents a crust from forming). Cover with plastic wrap or a warm, damp kitchen towel.
Place the bowl in a warm, draft-free spot. I often use my oven with the light turned on (but the oven turned off). Let it rise for 1 to 1.5 hours, or until it has doubled in size.
Phase 3: Shaping the Rolls
This is the technique that differentiates a sub roll recipe from a round dinner roll.
1. Punch the dough down gently to release air bubbles.
2. Turn it out onto a lightly floured surface and divide it into 6 equal pieces (use a kitchen scale for accuracy—about 120g each).
3. Take one piece and flatten it into a rough rectangle.
4. Roll the dough up tightly like a sleeping bag or a jelly roll. As you roll, use your thumbs to push the dough in, creating tension on the surface.
5. Pinch the seam shut tightly. This is crucial! If you don’t pinch the seam, the roll will unravel in the oven.
6. Gently roll the log under your palms to elongate it to about 6-8 inches. Taper the ends if you want that classic submarine rolls recipe look.
Phase 4: Second Rise and Baking
Place the shaped rolls seam-side down on a baking sheet lined with parchment paper and dusted with cornmeal. Cover loosely with greased plastic wrap. Let them rise for another 45 minutes to an hour. They should look puffy and touching slightly.
Preheat your oven to 400°F (200°C).
Chef’s Tip: For that bakery shine and golden color, brush the tops gently with an egg wash (1 egg beaten with 1 tbsp water) or milk before baking. Score the tops with a sharp knife or razor blade to control the expansion.
Bake for 18–22 minutes. Rotate the pan halfway through for even browning. They are done when they are golden brown and sound hollow when tapped on the bottom.
Expert Tips for Perfect Results
I have made this sub roll recipe dozens of times, and I’ve learned a few tricks along the way that will take your bread from “good” to “restaurant quality.”
- Weigh Your Ingredients: Baking is chemistry. A cup of flour can weigh anywhere from 120g to 150g depending on how you scoop it. Using a digital scale ensures you get the exact hydration needed for this easy sub roll recipe.
- Create Steam: This is my secret weapon. When you put the rolls in the oven, toss 3-4 ice cubes onto the bottom of the oven floor (or into a preheated cast-iron skillet on the bottom rack). The burst of steam keeps the crust soft for the first few minutes, allowing the bread to rise higher (oven spring) before the crust sets. This creates a lighter interior.
- Don’t Slice Too Soon: I know it’s tempting to cut into hot bread, but you must let these cool for at least 30 minutes. The bread continues to cook internally after you take it out. Cutting it while hot releases the steam and can make the inside gummy.
- High-Quality Flour: As mentioned, protein content is king. If you can find King Arthur Bread Flour or a similar high-protein brand, use it. It provides the structure necessary for hearty sub roll recipes.
Storage & Reheating
Since this sub roll recipe contains no preservatives, the rolls are best eaten within 24 hours. However, you can extend their life with proper storage.
- Room Temperature: Store cooled rolls in a paper bag for the first day to keep the crust crisp. If you store them in plastic immediately, the crust will soften (which is fine if you prefer soft rolls). After day one, move them to a sealed plastic bag to prevent staling.
- Freezing: These freeze incredibly well. Once fully cooled, wrap each roll individually in plastic wrap and then place them all in a large freezer bag. They will last for up to 3 months.
- Reheating: To revive a frozen or day-old roll, sprinkle it lightly with water and pop it into a 350°F oven for 5-8 minutes. This will re-crisp the crust and make the interior soft and warm again.
Serving Suggestions
Now that you have the perfect vessel, what should you put in it? The beauty of a sturdy sub roll recipe is its versatility.
- The Classic Meatball: Loaded with marinara, provolone, and homemade meatballs. The tight crumb of this roll prevents the sauce from leaking through.
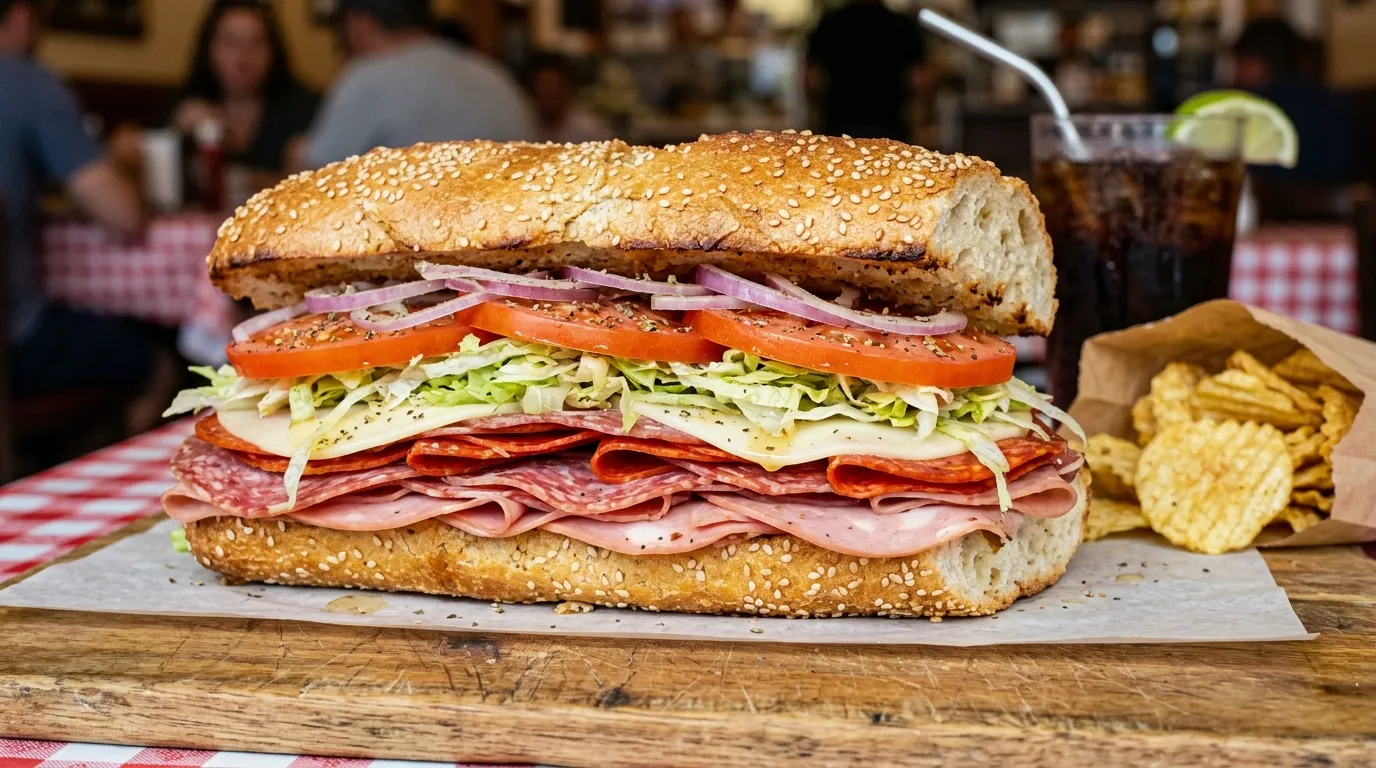
- Italian Cold Cut: Capicola, salami, pepperoni, provolone, lettuce, tomato, onion, and a splash of oil and vinegar.
- The Ultimate Grinder: If you want to impress your family, pair these rolls with my absolute favorite filling. Check out this Grinder Sandwich Recipe for the perfect creamy, crunchy salad topping that pairs flawlessly with this bread.
- Garlic Bread: Slice the rolls open, spread with garlic butter, and broil until bubbly.
Conclusion
Mastering a homemade sub roll recipe is a game-changer for home cooks. It allows you to control the ingredients, avoid preservatives, and enjoy the unparalleled taste of fresh bread. The texture of these rolls—chewy, soft, and substantial—is something you just can’t get from a plastic bag at the grocery store.
Whether you call them hoagies, grinders, or subs, this recipe will be the foundation of many delicious meals to come. I hope you enjoy the process of kneading and shaping as much as I do.
Did you make this recipe? I’d love to hear how it turned out! Rate the recipe below or leave a comment about your favorite sandwich filling.
Common Questions About Sub Roll Recipe
Can I make the dough ahead of time?
Yes! You can let the dough do its first rise in the refrigerator overnight (up to 12 hours). This cold fermentation actually develops more flavor in sub roll recipes. Just let the dough come to room temperature for about 30 minutes before shaping.
Why are my rolls heavy and dense?
This usually happens for two reasons: either the yeast was dead (always check the expiration date), or you added too much flour during kneading. The dough should be slightly tacky to the touch. If it’s dry and stiff, the rolls will be dense.
Can I use whole wheat flour?
You can, but whole wheat flour absorbs more liquid and has sharper bran flakes that cut gluten strands. For an easy sub roll recipe that is still fluffy, I recommend using 50% bread flour and 50% whole wheat flour. You may need to add an extra tablespoon of water.
Do I need a stand mixer?
No, you don’t. While a mixer makes it easier, kneading by hand is very effective. It will take about 10–12 minutes of vigorous kneading by hand to get the gluten developed enough for this sub roll recipe.
Can I make these vegan?
This recipe is naturally vegan if you use olive oil! Just skip the egg wash on top and use water or a plant-based milk for brushing before baking.