Crispy Buttermilk Fried Chicken Thighs
Equipment
- Cast-iron skillet or Dutch Oven
- Wire Cooling Rack
- Thermometer
Ingredients
The Chicken
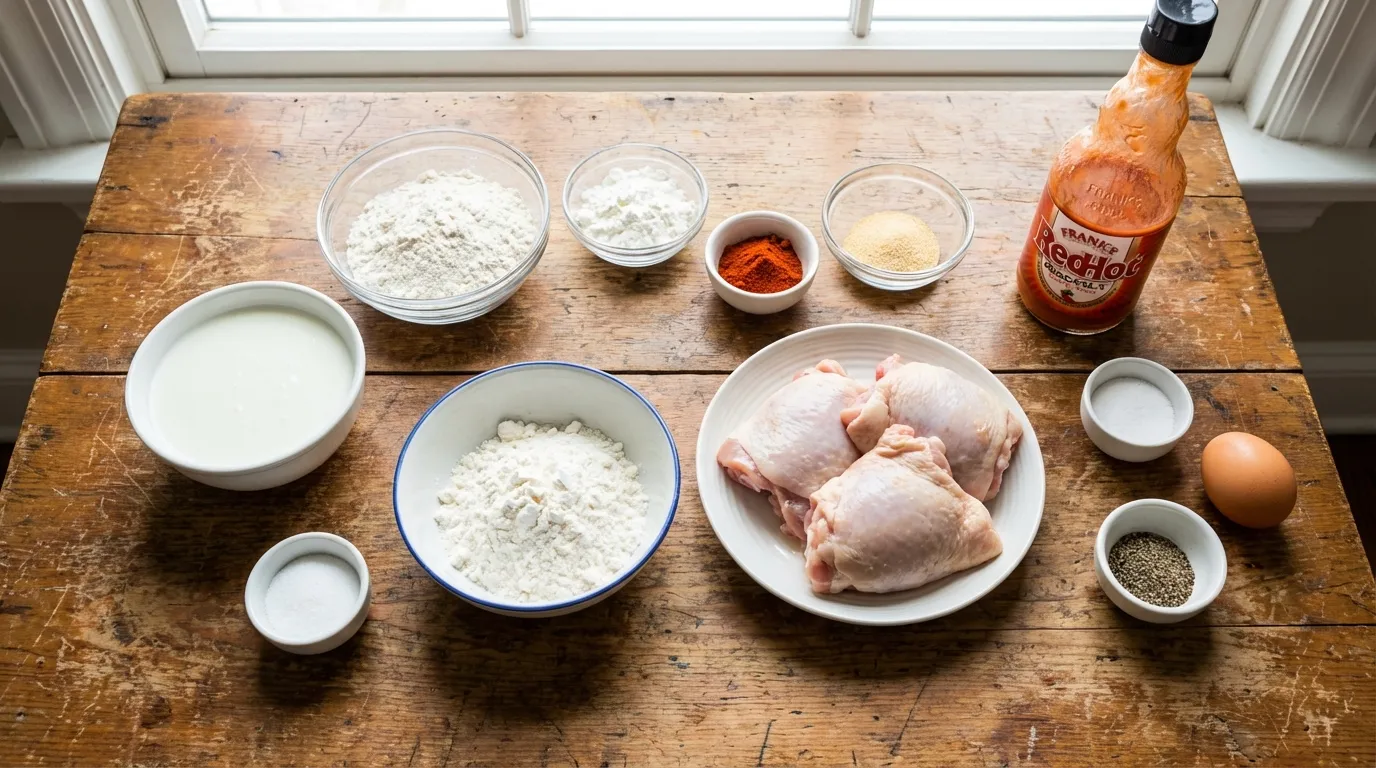
- 4 pieces bone-in, skin-on chicken thighs
The Marinade (Wet Mix)
- 1 cup buttermilk
- 1 tbsp vinegar-based hot sauce Tabasco or Frank’s
- 1 large egg
- 1 pinch salt
The Dredge (Dry Mix)
- 1.5 cups all-purpose flour
- 0.5 cup cornstarch cornflour
- 1 tsp baking powder
- 1 tbsp smoked paprika
- 1 tbsp garlic powder
- 1 tbsp onion powder
- 1 tsp dried oregano
- 1 tsp white pepper
Frying
- 2 cups Peanut oil or canola/vegetable oil for frying
Instructions
- Phase 1: The Marinade
Pat your chicken thighs dry with paper towels. Wet chicken dilutes the marinade. - In a large bowl, whisk together the buttermilk, egg, hot sauce, and a pinch of salt.
- Submerge the chicken. Cover and refrigerate for at least 1 hour (4 hours is best).
- Phase 2: The Dredge
In a shallow baking dish, whisk together the flour, cornstarch, baking powder, and all your spices (paprika, garlic powder, onion powder, oregano, white pepper). - Take a piece of chicken out of the buttermilk, letting the excess drip off for just a second.
- Lay it in the flour mixture. Press down hard to pack the flour into every crevice. Flip and repeat. Shake off loose excess.
- Optional Tip: Drizzle 2 tablespoons of leftover marinade into the flour mix to create crunchy clumps.
- Phase 3: The Fry
Fill a cast-iron skillet or Dutch oven with about 2 inches of oil. Heat it to 350°F (175°C). - Carefully lay the chicken into the oil, skin-side down, laying it away from you to avoid splashes.
- Fry in batches (2-3 pieces at a time) to avoid overcrowding. Fry for about 6–7 minutes per side.
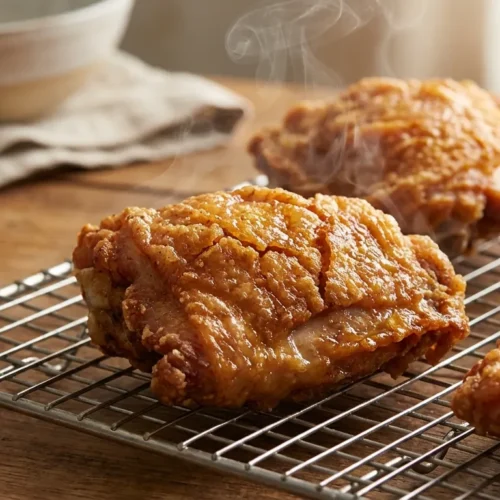
- Remove when golden brown and internal temperature reaches 165°F (74°C). Drain on a wire rack, not paper towels.
Notes
Reheat: Air fry at 360°F for 4-5 minutes or bake at 375°F for 15-20 minutes.
Oil Temp: Keep oil steady at 350°F. If it drops too low, chicken becomes greasy.
There is a specific sound that signals a good dinner is coming—the violent, rhythmic sizzle of cold chicken hitting hot oil. It’s a sound that promises comfort, nostalgia, and messy fingers. If you have been searching for the ultimate fried chicken thighs recipe, you have officially landed in the right kitchen.
I’ve spent years working the fry station in professional kitchens, and I can tell you that while chicken breast gets all the marketing glory, the thigh is the undisputed king of flavor. It’s forgiving, it’s juicy, and it holds up beautifully to high heat. This isn’t just another recipe; it’s a method I’ve refined over hundreds of Sunday dinners. We are talking about shatteringly crisp skin, meat that drips with juice when you bite into it, and a seasoning blend that hits every single taste bud.
In this post, I’m going to teach you how to master this classic. Whether you are using a deep fryer or a heavy cast-iron skillet, this fried chicken thighs recipe delivers restaurant-quality crunch in under 30 minutes of active cooking time.
Why You’ll Love This Fried Chicken Thighs Recipe
If you are looking for the “secret” to the best fried chicken thighs, it usually comes down to science and patience. Here is why this specific method works better than the rest:
- Maximum Crunch Factor: By using a mix of flour and cornstarch (cornflour), we create a coating that doesn’t just brown—it shatters.
- Impossible to Overcook: Unlike white meat, fried chicken thighs have a higher fat content, keeping the meat succulent even if you leave it in the oil a minute too long.
- The “Velvet” Marinade: We use a buttermilk brine which uses enzymes to break down proteins, ensuring the chicken thigh fried chicken is tender all the way to the bone.
- Pantry Staples: No obscure ingredients here. You likely have everything you need in your cupboard right now.
Ingredients & Substitutions
To get that perfect chicken thigh fried recipe result, the quality and type of ingredients matter just as much as the technique. Here is what I use and why.
The Chicken
Obviously, the star of the show. I recommend using bone-in, skin-on chicken thighs. The bone acts as a heat conductor, helping the meat cook evenly, while the skin protects the flesh and renders down into that crispy layer we all fight over.
Substitution:* You can use boneless, skinless thighs for a faster cook time (essentially making giant nuggets), but you lose some depth of flavor.
The Marinade (Wet Mix)
- Buttermilk: This is non-negotiable for me. The acidity tenderizes the meat. If you don’t have buttermilk, mix 1 cup of whole milk with 1 tablespoon of white vinegar or lemon juice and let it sit for 10 minutes.
- Hot Sauce: I use a vinegar-based hot sauce (like Tabasco or Frank’s). It doesn’t make the chicken spicy; it just adds a savory “tang” that cuts through the rich breading.
- Egg: This acts as the glue. Without it, your breading might slide off in the oil.
The Dredge (Dry Mix)
- All-Purpose Flour & Cornstarch: A 100% flour crust can sometimes get heavy or soggy. Cutting the flour with cornstarch (about a 3:1 ratio) lightens the crust and makes it incredibly crispy.
- Seasoning: We are going heavy on smoked paprika, garlic powder, onion powder, dried oregano, and white pepper. White pepper is crucial—it provides that earthy, floral heat synonymous with Southern fried chicken thigh recipes.
The Oil
You need an oil with a high smoke point.
- Peanut Oil: My top choice. It adds a subtle nutty aroma and handles high heat beautifully.
- Canola or Vegetable Oil: Great neutral alternatives that are budget-friendly.
- Avoid: Olive oil or butter. They will burn before your chicken is cooked.
How to Make Fried Chicken Thighs Recipe
This process is broken down into three easy phases to keep your kitchen organized.
Phase 1: The Marinade
The goal here is flavor penetration.
1. Pat your chicken thighs dry with paper towels. This is a pro tip—wet chicken dilutes the marinade.
2. In a large bowl, whisk together the buttermilk, egg, hot sauce, and a pinch of salt.
3. Submerge the chicken. Cover and refrigerate.
Chef’s Tip:* Let it sit for at least 1 hour, but 4 hours is the sweet spot. If you are in a rush, even 30 minutes helps, but patience pays off with fried chicken thighs.
Phase 2: The Dredge
This is where we build the crust.
1. In a shallow baking dish (pie plates work great), whisk together the flour, cornstarch, baking powder, and all your spices.
2. Take a piece of chicken out of the buttermilk, letting the excess drip off for just a second.
3. Lay it in the flour mixture. Press down hard. You want to pack that flour into every crevice of the skin.
4. Flip and repeat. Shake off the loose excess.
Chef’s Tip:* Drizzle about 2 tablespoons of the leftover buttermilk marinade into the dry flour mixture and stir it with a fork to create little clumps. These clumps fry up into extra-crunchy “nuggets” attached to the chicken.
Phase 3: The Fry
Now, we turn up the heat.
1. Fill a cast-iron skillet or Dutch oven with about 2 inches of oil. Heat it to 350°F (175°C). Use a thermometer!
2. Carefully lay the chicken into the oil, skin-side down, laying it away from you to avoid splashes.
3. Do not overcrowd the pan. Fry in batches (2-3 pieces at a time). Overcrowding drops the oil temperature too fast, resulting in greasy, soggy chicken rather than pan fried chicken thighs that are crisp.
4. Fry for about 6–7 minutes per side.
Expert Tips for Perfect Results
I have ruined my fair share of batches in the past, so learn from my mistakes. Here are the secrets to nailing this fried chicken thighs recipe every single time.
1. Temperature Control is King
The biggest mistake home cooks make is guessing the oil temperature. If the oil is too cool (under 325°F), the chicken absorbs the oil like a sponge. If it’s too hot (over 375°F), the outside burns before the inside is cooked. Keep your oil steady at 350°F.
2. The Wire Rack Rule
Never, and I mean never, drain your fried chicken thighs on paper towels. The steam from the hot chicken gets trapped between the meat and the paper towel, turning your crispy crust into mush within minutes. Always drain on a wire cooling rack set over a baking sheet. This allows air to circulate, keeping the crust crunchy.
3. Don’t touch it!
When you first place the chicken in the pan, let it be. If you try to move it too early, the breading will tear off. Let the crust set for at least 3 minutes before you check it.
4. The Double Dip (Optional)
For an extra thick, fast-food style crust, dip the chicken in flour, back in the buttermilk, and then back in the flour again. This makes a very heavy crust, so only do this if you love a lot of breading.
Storage & Reheating
If you are lucky enough to have leftovers (which rarely happens in my house), you need to store them correctly to preserve that fried chicken thighs recipe magic.
- Fridge: Store in an airtight container for up to 3 days.
- Freezer: You can freeze fried chicken for up to 2 months, though the crust will be slightly more fragile upon thawing.
How to Reheat:
Please, step away from the microwave. The microwave is the enemy of crispy skin.
1. Oven Method: Preheat oven to 375°F (190°C). Place chicken on a wire rack over a baking sheet. Bake for 15–20 minutes until heated through and the skin re-crisps.
2. Air Fryer: This is actually my favorite method. Air fry at 360°F for 4–5 minutes. It tastes almost as good as fresh.
Serving Suggestions
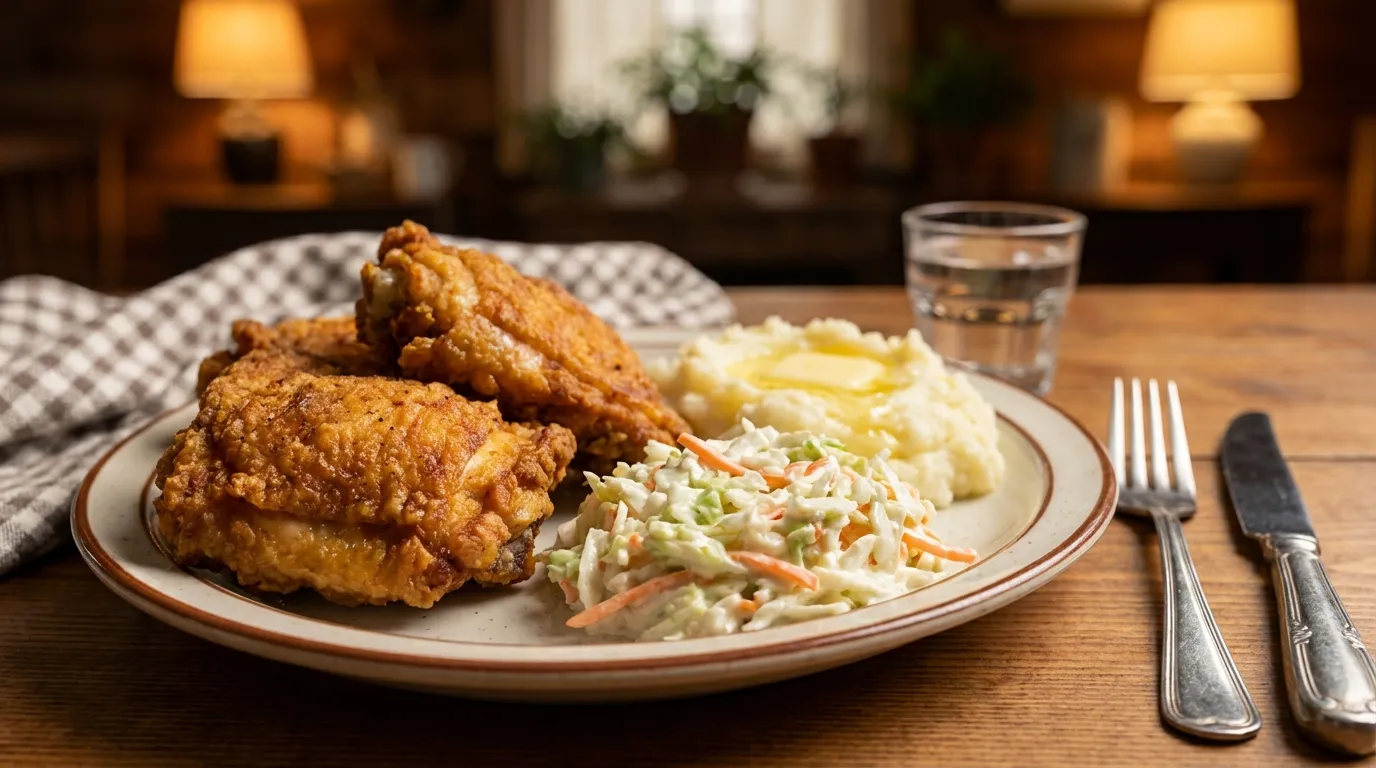
Balance is key when serving a rich dish like this. Since the fried chicken thigh is savory and fatty, you want sides that offer acidity or freshness.
- Classic Southern: Creamy coleslaw, mashed potatoes with gravy, and buttermilk biscuits.
- Fresh & Light: A cucumber and vinegar salad or charred green beans with lemon.
- Spicy Twist: Drizzle the finished chicken with honey mixed with chili flakes (Hot Honey) for a sweet and spicy kick.
If you are looking to round out your meal or want to understand the basics of preparing the meat before frying, check out my guide on how to cook chicken thigh perfectly for more preparation techniques.
Conclusion
Mastering this fried chicken thighs recipe is a rite of passage for any home cook. It transforms humble, inexpensive ingredients into a meal that feels like a celebration. The contrast between the rugged, seasoned crust and the tender, steaming meat is a texture experience you just can’t get from takeout.
Fire up that stove, keep your eye on the thermometer, and get ready for the best meal of your week. Did you make this? I’d love to see your results! Rate the recipe below and let me know how it turned out.
Common Questions About Fried Chicken Thighs Recipe
How long to fry chicken thighs to ensure they are done?
Generally, bone-in thighs take about 12 to 14 minutes total (6–7 minutes per side) at 350°F. However, time is just a guideline. Always use a meat thermometer. You want an internal temperature of 165°F (74°C). Because thighs are dark meat, they are actually even better at 175°F, where the connective tissue breaks down further.
Can I use this marinade for other fried chicken thigh recipes?
Absolutely. This buttermilk marinade is a universal base. You can use it for pan fried chicken thighs, oven-fried versions, or even for frying chicken tenders. It guarantees moisture regardless of the cooking method.
How long to deep fry chicken thighs vs pan frying?
If you are fully submerging the chicken in a deep fryer, how long to deep fry chicken thighs is slightly shorter than pan-frying because the heat surrounds the meat instantly. Expect deep frying to take about 10–12 minutes. Pan-frying takes a bit longer because you have to flip the meat and manage heat distribution.
Can I make this gluten-free?
Yes! To adapt this chicken thigh fried recipe for gluten-free diets, swap the all-purpose flour for a high-quality 1:1 Gluten-Free Flour blend (like King Arthur or Bob’s Red Mill). Keep the cornstarch; it is naturally gluten-free and essential for the crunch.
Why is my fried chicken thigh breading falling off?
This usually happens for two reasons: either the oil wasn’t hot enough, or you didn’t press the flour into the chicken firmly enough. Another culprit is putting the chicken into the oil wet—make sure you shake off excess buttermilk before dredging. Also, check out this fried chicken thigh history to understand how different coatings affect the final bond!